2-Way Switching With A 3-Wire System And Old Cable Colors
Ever wondered how the old-school 2-way switching with a 3-wire system functioned, especially before the introduction of harmonized cable colors in the UK?
This method was a staple in electrical wiring, offering the flexibility to control a single light from two different spots.
In this dive into the past, we’ll uncover the mechanics and advantages of this traditional setup, all while keeping an eye on how it aligns with modern safety standards.
We’ll be exploring:
- What made the 2-way switching with a 3-wire system using old cable colors so reliable?
- How did the color coding of cables contribute to ease of installation and conformity?
- Why is it important to understand these historical configurations in today’s context of updated wiring regulations?
Prepare to shed light on a piece of electrical history.
Let’s get started!

Contents
Overview of 2-Way Switching with a 3-Wire System
2-way switching with a 3-wire system involved the use of two switches to control a light or fixture from different locations.
It required a 3-core cable, which comprised three individual wires with specific colors for each wire.
This configuration enabled users to operate lights or fixtures from multiple points within a room or building.
2 way switching (3 wire system, old cable colours)
Two-way switching, using a three-wire system and older cable colors, enables the control of a single light from two or more different locations through switches.
This setup is particularly useful in places like staircases, where you might have a switch at both the top and bottom, or in long corridors that have a switch at each end.
In this scenario, the system involves two single gang two-way switches connected by a three-wire control, depicted using the older cable color scheme.
While a two-wire control system can also be used to achieve a similar functionality and might reduce the amount of cable used, it is generally not the preferred method.
The three-wire setup is recommended for its reliability and safety.
Here we a have a schematic (Fig 1) which makes it easy to visualise how this circuit works.
In this state the lamp is off, changing the position of either switch will switch the live to the lamp turning it on.
If you now change the position of the other switch the circuit is broken once again.

Fig 1: Two way switching schematic wiring diagram (3 wire control)
The schematic is nice and simple to visualise the principal of how this works but is little help when it coms to actually wiring this up in real life!!
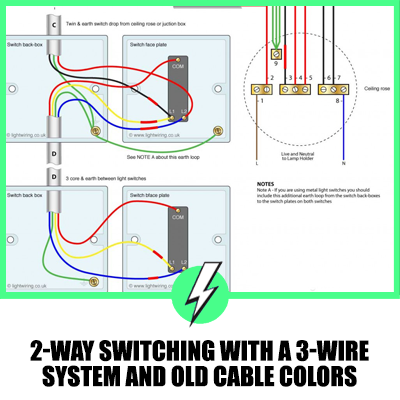
Fig 2 below shows how we achieve this configuration. Just like any loop-in loop-out radial circuit, the switch cable from the ceiling rose contains two wires, a permanent live and a switched live.
This is cable C below, one wire connects to L1 and the other to L2 on the top switch.
Cable D (Fig 2) is a three core and earth, this is the ‘3 wire control’ that links the two light switches together.
COM on the first switch connects to COM on the second switch, L1 on the first switch connects to L1 on the second, and L2 on the first switch connects to L2 on the second.
All earth wires should connect to the earth terminal in the switch back-box and if you are using metal switches there MUST be a loop from this earth terminal to the one on the switch plate (see note A on Fig 2)

Fig 2: Two way switching using a 3 wire control (shown in the old cable colours)
NOTE: The blue and yellow wires in cable ‘D’ and the black wire in cable ‘C’ are switched lives and thus should be marked with red sheathing at each end as shown.
Switch drops from a junction box
There is a chance that if your house has these old wiring colours the switch drops may be from a loop-in-loop-out radial lighting circuit done with junction boxes rather than ceiling roses as shown in Fig 2.
The switch wiring is all the same but the switch wire (cable C) leads up to a different set up.
Fig 3: 3 way switching wired to a loop-in-loop-out radial lighting circuit done with junction boxes
Key Components and Connections
- Two Switches: Two 2-way switches were utilized in this setup. One switch was typically located at the bottom of a stairwell or the entrance of a room, while the other switch was positioned at the top of the stairs or at a secondary location within the room.
- 3-Core Cable: To establish connections between the switches and the light or fixture, a 3-core cable was used, comprising three individual wires with specific colors:
- Red: Common wire
- Black: Switched live wire
- Green/Yellow: Earth wire
- Lighting Point: The lighting point referred to the location of the light or fixture being controlled. It was connected to the switches using the 3-core cable.
Switching Operation
The 2-way switch configuration allowed users to control the light or fixture from either switch position.
When one switch was in the “on” position, the other switch could toggle the light off or on.
The common wire (red) alternated between the switches to control the flow of electricity to the light or fixture.
Advantages of 2-Way Switching with a 3-Wire System
- Convenient Lighting Control: This wiring configuration provided users with the ability to control lights or fixtures from multiple locations, enhancing convenience and flexibility within a space.
- Established Wiring Standard: The old cable colors, including red, black, and green/yellow, were widely recognized and followed in the UK, ensuring conformity and ease of installation.
- Reliability: 2-way switching with a 3-wire system and old cable colors had been used for many years and had proven to be a reliable wiring solution in residential and commercial settings.
Transition to Updated Wiring Regulations
It is important to note that the UK has implemented updated wiring regulations to enhance safety and standardization in electrical installations.
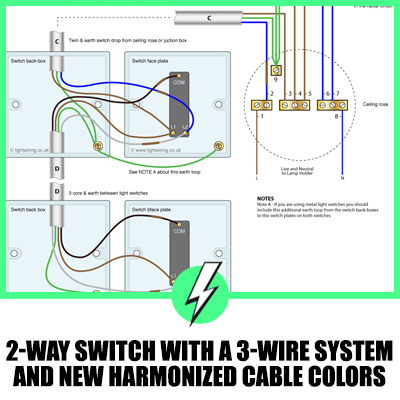
New cable colors have been introduced to align with these regulations.
Therefore, it is crucial to comply with the current standards and guidelines when installing or modifying lighting circuits.
Conclusion
2-way switching with a 3-wire system and old cable colors was a widely adopted electrical wiring configuration in the UK.
By understanding its key components, connections, and switching operation, individuals can gain insights into historical electrical wiring practices.
However, it is important to acknowledge the transition to updated wiring regulations and adhere to the current standards for electrical safety and conformity.
The 2-way switching configuration, with its convenient lighting control, adherence to established wiring standards, and proven reliability, played a significant role in lighting installations before the introduction of updated regulations.


