A Step-by-Step Guide to Wiring a Simple Lighting Circuit in the UK
Wondering how to wire a simple lighting circuit in the UK?
This basic electrical task is essential for illuminating a room or area in your home, but it must be done correctly to ensure safety and efficiency.
Wiring a lighting circuit involves connecting light fixtures to a switch, creating a convenient way to control your lights.
But how do you do this safely and in compliance with UK wiring standards?
Well, we’ll be going over:
- What exactly is a simple lighting circuit, and how does it function?
- What are the key steps in wiring a lighting circuit from start to finish?
- What safety precautions and UK wiring regulations should you be aware of?
Let’s dive into the details and shed some light on this enlightening process!
Contents
Understanding a Simple Lighting Circuit
A simple lighting circuit consists of a light fixture or multiple fixtures connected to a switch.
When the switch is turned on, it completes the circuit, allowing electricity to flow and illuminate the lights.
This type of circuit is suitable for lighting individual rooms, such as bedrooms, living rooms, or hallways.
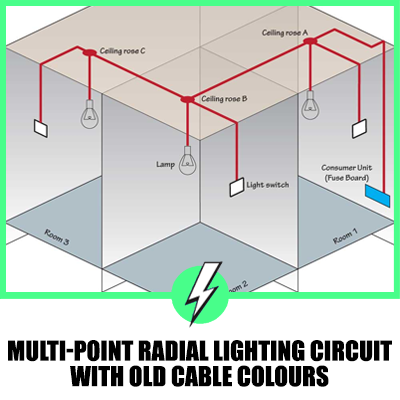
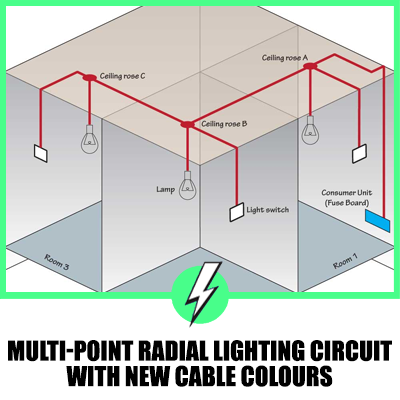
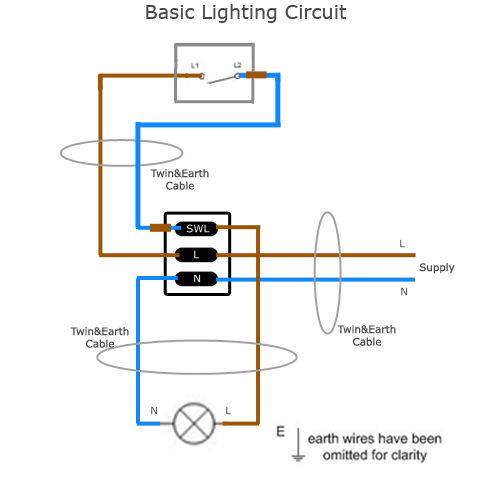
Simplified Lighting Circuit Diagram
This diagram illustrates the typical wiring route between key points (supply, switch, light) using flat Twin&Earth cables, which is the standard in current house and commercial lighting setups.
This method minimizes cable breaks and streamlines the installation process.
Here’s a step-by-step guide to the wiring process:
Step 1: Begin by running a cable from the power source (distribution board) to the light fixture.
Important: Do not connect this cable to the power source until the entire circuit is completed and tested in accordance with BS 7671 regulations, including a Safe Isolation Procedure.
Step 2: Attach the supply cable to the L and N terminals on the light fixture. Connect the Line (brown) wire to the L terminal and the Neutral (Blue) wire to the N terminal.
The L terminal is usually the one without any existing connections, whereas the N terminal may already have a connection for the light’s Neutral. In standard light fixtures, these terminals are typically marked.
If not, use push-in or strip connectors for the connections, remembering to also connect the Earth wire to its terminal.
Step 3: Next, run a flat Twin&Earth cable from the light fixture to the switch. Attach the Line (brown) wire to the light’s L terminal and the blue wire (with brown sleeving) to the SWL terminal, which is linked to the light.
Always connect the Earth wire to its respective terminal. The brown sleeving on the blue wire is crucial as it signifies that the wire is a switched Line rather than a Neutral.
Step 4: Connect the light switch to the cable from the light.
Attach the Line (brown) wire to the L1 terminal and the blue wire (with brown sleeving) to the L2 terminal, ensuring the Earth wire is also connected.
This forms the loop for the switched Line wire, utilizing flat Twin&Earth cable, as depicted in the initial diagram.
After testing and connecting to the power supply, the lighting circuit will be ready for use.
Key Components and Wiring Facts
- Light Fixtures: Light fixtures are the points where the lights are installed. They typically consist of a bulb holder and a switch connection point.
- Twin and Earth Cable: Twin and earth cable is used for the wiring connections in a simple lighting circuit. It consists of three individual wires:
- Brown (or red): Live or line wire
- Blue or black: Neutral wire
- Green/Yellow: Earth wire
- Light Switch: The light switch controls the flow of electricity to the light fixtures. It allows users to turn the lights on or off.
Step-by-Step Guide to Wiring a Simple Lighting Circuit
- Turn Off the Power: Before starting any electrical work, ensure the power is switched off at the consumer unit to prevent any electrical hazards.
- Plan the Circuit: Determine the number and location of light fixtures required for the lighting circuit. Consider the layout of the room and the desired placement of the switches.
- Install the Light Fixtures: Install the light fixtures at the desired locations, following the manufacturer’s instructions. Ensure proper grounding by connecting the earth wire to the fixture’s earth terminal.
- Connect the Live Wires: Run a live wire (brown or red) from the consumer unit to the light switch. Connect it to the common terminal (usually marked “COM”) on the switch.
- Connect the Switched Live Wires: Run a separate wire from the switch to each light fixture. Connect these wires to the switch’s switched live terminals (usually marked “L1” or “1-way”).
- Connect the Neutral Wires: Connect the neutral wire (blue or black) from the consumer unit to each light fixture. This wire connects to the neutral terminal (usually marked “N”) on each fixture.
- Connect the Earth Wires: Connect the earth wire (green/yellow) from the consumer unit to each light fixture. This wire connects to the earth terminal on each fixture.
- Test the Circuit: After completing the wiring connections, switch on the power and test the lighting circuit by turning the switch on and off to ensure proper functionality.
Safety Precautions
- Always turn off the power before starting any electrical work.
- Use proper insulation and protection for all wiring connections.
- Ensure correct wire sizing to handle the expected load.
- Follow UK wiring regulations and consult a qualified electrician if needed.
Conclusion
Wiring a simple lighting circuit is a straightforward task when it comes to providing lighting in a single room or area.
By understanding the components, wiring facts, and following a step-by-step guide, individuals can confidently wire a simple lighting circuit, allowing for convenient control of the lights.
Safety should always be a priority, and adherence to UK wiring regulations is essential. If in doubt, consult a qualified electrician for assistance.
By following these guidelines, homeowners can create a reliable and efficient lighting system in their living spaces.