How To Test An Electrical Outlet With A Multimeter
A multimeter is convenient and versatile at the same time. Also, this multi-function electrical testing equipment is very affordable. Any decent multimeter can measure current, voltage, and resistance. However, high-end multimeters can measure other components, such as frequency, temperature, humidity, and acidity.
Although homeowners are no exception, most DIYers and homeowners also have a multimeter in their toolbox. Using a multimeter is effortless even without prior experience. Of course, safety precautions are essential before handling electrical pieces of equipment, and the multimeter is no different. In this regard, reading multimeter’s instructions can be a vital piece of information.
With that out of the way, testing electrical outlets with a multimeter is pretty standard. But if you’re not sure how to proceed, here is a step by step guide.
Contents
Testing an electrical outlet with a multimeter
Step 1. Setting up the multimeter
Before you set up the multimeter, it is always good to check the manufacturer’s instructions. This is very helpful since every different brand and models of electric equipment come with specific information.
Turn the multimeter ON and turn the dial to AC setting. While testing electrical outlets with a multimeter, you are checking the presence of alternating current or AC. Here, you are looking for the spot with ~A or A~ or ~V or V~ on the dials. AC and DC on a multimeter should be easy to differentiate since DC is marked with a straight line.
For testing voltages, you need to set the dials on the higher settings. Power outlets in Britain have a standard voltage of 230V. So you need to set the dial at 600 on the multimeter.
Some digital multimeters have an auto-function. In this case, you do not need to select the test range manually. The meter will automatically select the function the instant the test leads touches the circuit. If you know that your multimeter has this feature, you just need to switch it on.
When it comes to the probes, the black one goes into the COM, the common socket. Depending on the multimeter’s model, you might see a – sign next to the COM model. The red probe, on the other hand, goes into the VmA socket. In some models, you might also see VΩmA. In most multimeters, this socket is at the right bottom.
Step 2. Testing the outlet
Before you start testing the outlets, it is a smart idea to wear protective gloves. If you don’t have one already, you might want to check out this industry-grade protective gloves for all electrical works.
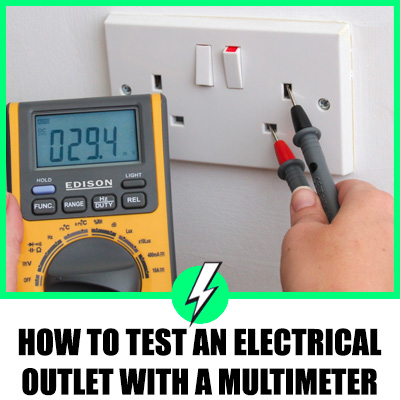
Hold the test leads in your hands and get ready to insert it into the outlets. The black metal lead goes into the neutral terminal, the left slot on the power outlet. On the other hand, the red probe goes into the live wire terminal, the right slot. Take note that you insert the black lead first followed by the red lead.
A correctly working power outlet should show a reading in the range of 230 or a little higher. Test reading in the range of 230 to 250 is always a good number. An abnormal reading on the multimeter indicates that the outlet is malfunctioning.
How to test whether an electrical outlet is grounded.
After you check and test that the voltage on the outlet is correct, you can test if that particular outlet is grounded.
Here, the black lead goes into the earth/ground terminal. Hold the red lead probe, on the other hand, and insert it into the neutral terminal that is on the left.
On outlets with a good ground, the reading on the multimeter should show a reading of zero. A reading on the multimeter between the neutral and ground, the wires on the outlet, is reversed. Electrical outlets with reversed wiring may not pose any problem for light fixtures or charging phones. However, for electronic such as computers and other appliances, the outlet might not be safe to use.
You can also hold the black metal probe to the earth terminal and insert the red one in the live terminal. If the outlet is grounded correctly, the reading on the multimeter should show a reading of about 230, give or take. Only the live terminal should show a reading in a correctly working outlet.
After you complete testing the electrical outlets, switch off the multimeter. This will prevent the battery from draining.
Safety tips for testing electrical outlets with a multimeter
- You can clean the test leads of multimeters if they have grime on them. Wiping them with a soft damp cloth is enough to get rid of any contaminants. However, you should take note that they are completely dry before using them.
- Always check that the test leads are in good condition before use. Watch out for cracks in the insulation or possible heat damage.
- While testing electrical outlets with a multimeter, take note that the area is clean and dry. If you are working on an exterior outlet, kneel or stand on an insulated mat.
- Every article of clothing on your body must be bone-dry while testing with electrical pieces of equipment. Even if the gloves you are using are insulated, it will be as good as useless if it is damp or wet.
- Carrying metal components in your pockets when working around electrical outlets should also be avoided.
How to tell if the test probes are working correctly
Determining whether the test probes are working correctly or not is straightforward. Here’s how.
- Set the meter of the multimeter to continuity test option. Alternatively, you can also set it to ohms.
- Hold the test leads by the insulated parts and touch the ends together.
- A correct function test probes will show a zero reading on display.
How to check grounding with multimeter
Is it possible that you can check your own sockets for faults before replacing sockets and light fittings?
Yes, you can do some basic fault finding if you have a multimeter. It’s always a good starting point to understand if there is a problem with the circuit, such as a dodgy ground wire. However, multimeters are not toys, and you can receive a shock if you do not know what you are doing.
How do you check the grounding with a multimeter?
Here is a simple step by step guide to checking if the earth is good or bad in a circuit.
Prepare the multimeter.
- Ensure the RED probe is connected to the VΩma terminal, and the BLCK probe is connected to the COM terminal.
- Turn the dial to V ⏦ measuring mode.
- Press select to change the voltage over to AC (Alternating current).
- The display screen will show⏦ this symbol for AC.
To conduct the test
- Touch the BlACK probe to the earth terminal and the RED probe to the neutral terminal
- Switch on the power supply, and you will be able to read the voltage measurements displayed on the screen
- Test complete
In theory, the voltage difference between earth and neutral should be zero, but it’s acceptable to measure 2 to 4 VAC. The closer to zero denotes the better earth connection.
What does a 0 ohm reading mean?
Resistance uses the symbol (Ω). This is the measurement of how much resistance is in a circuit at any one given time.
If the measurement is 0, you have a perfect circuit without shorts or any other problems. However, it’s rare to get a 0 reading, and in most cases, it will be 0.8 or 1 reading.
Can you get shocked with a multimeter?
Yes. Multimeters are meant to be used by professionals, but with some common sense, the DIY enthusiasts can make good use of a multimeter.
Did you know that many electricians receive electric shocks from multimeters? Shock hazards are real when working with live circuits, and if the multimeter has not been maintained, you should let a professional do the job.
Can you touch a live wire with a multimeter?
Yes, but never touch a live cable with your hands. It could be fatal. When using a multimeter, make sure you switch from DC to ACV before taking a measurement and start your testing at the upper limits of the current range.
What is the most important thing to remember when measuring resistance with a multimeter?
You can measure the resistance of a component without electricity flowing through the circuit. If you need the resistance of, say, a 2 pole resistor, then touch on either end and measure the reading.
If you can check the component individually, you will get a better reading as other components may influence the measurement.
What does OL mean on a multimeter?
Overload, but don’t worry. The multimeter will show OL when it’s not connected to anything.
Bottom line
Testing electrical outlets with a multimeter gives the most accurate results. The process is relatively easy and safe. However, understanding how to carry it out correctly is paramount.